Our ideas will help you make your suburban residence more joyful and colorful, and you can decorate and paint a variety of little things from the interior with your children!
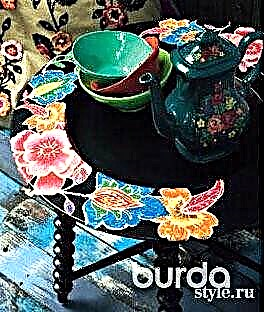


TABLE WIPES
A multicolored wreath of glued paper flowers makes the table a luxury accessory.
YOU WILL NEED: table-tray in black, color copies of large fantasy flowers, decoupage glue, acrylic paints, brushes, scissors, transparent varnish.
PERFORMANCE: cut out the floral motif you like and place it on the edges of the table tray for testing. Then stick the motifs with decoupage glue. To do this, lubricate the reverse side of the motif with a thin layer of glue, put the motif on the surface of the tray and with a dry brush, smoothing, gently draw from the center of the motif to its periphery. Remove excess adhesive from the edges with a dry cloth. After the glue dries, cover the tray with clear varnish.
 CARTOON DECORATED WITH INSIGNED FOIL
An embossed foil, a little paint - and the plywood box turns into a "holy grail" for postcards, letters and other little things that evoke pleasant memories ...
The motive for the box cover is given at the beginning of the article next to the photo of the model.
YOU WILL NEED: small wooden (plywood) box with a lid; acrylic colors of orange, red, purple,green flowers; silver foil for embossing; paints for painting porcelain of orange, red, purple, green colors; universal glue; masking tape; tracing paper; rubber mat for embossing; embossing tools; universal scissors; wide and thin brushes; ball pen; pencil.
PERFORMANCE: paint the box with acrylic first. Allow the paints to dry completely. Copy the motive sample to the tracing paper and enlarge to the desired size. Manually rotate the curls in the corners onto the cover. Then paint the corner motifs with acrylic paints with a thin brush. The central motif is approximately cut out and fixed with adhesive tape on a large sheet of foil. Transfer all lines with a ballpoint pen, and do not press too hard, and put work on a rubber mat. Delete template. Cut the motif at a distance of 1 mm from the outline. Then process the motif with embossing tools. First deepen all the notches. Then turn the foil over and process it with a round hammer. Finally, paint the motif with paints for painting porcelain with a thin brush. Leave the motive to dry overnight, after which it is burned in the oven according to the instructions of the paint manufacturer. Fix the motive on the box cover with universal glue.

SCHEDULED PLATES
Summer, bathing, barbecue ... Hand-painted and varnished plates will immediately remind you of the warm season, even if an autumn rain drizzles outside the window.
Motives for paintings AE are given at the beginning of the article next to the photo of the model.
YOU WILL NEED: wooden plates and coasters; acrylic paints of yellow, orange, red, blue and green; soldering iron; burda carbon paper; masking tape; tracing paper; brush; pencil.
PERFORMANCE: copy motifs onto transparent paper and repeat along dashed lines first halfway, then to the whole circle. To do this, fold the transparent paper along the dashed line and translate the motive lines. Finished samples to increase to the size of plates. On the plates with the print side down, secure the transfer paper. Then copy all the lines of motives to the plates, without pressing hard with a pencil. Remove motifs and carbon paper, burn out all lines with a soldering iron. Finally, paint the plates with acrylic paints. Allow the paints to dry completely.
Photo: Matteo Manducio, editor: Claudia Risland, materials: Dagmar Murcudis.
Material prepared by Elena Karpova