Embroidered, and in some places painted motifs from the famous fairy tale about the Gray Wolf and Little Red Riding Hood - a wonderful decoration for both the nursery and for a variety of things for the child.
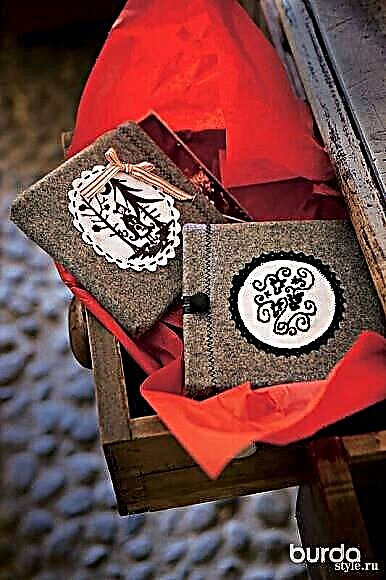


CD CASES
Or any other electronic toys of your child. They will serve as a fabulous cover for an interesting album or game.
Size approx. 13.5 x 15.5 cm (you can resize accordingly to your gadget and choose any motive from this article).
Motives for embroidery are given in the photo series at the beginning of the article.
YOU WILL NEED: 2 gray felt items measuring 15.5x36 cm each; 2 flaps of white cotton fabric 10x10 cm each; tracing paper; pencil; 1 black felt-tip pen; film for transferring the image to the fabric; pencil for drawing ironing; black cotton yarn for embroidery (Coast); 1 black button with a diameter of 1.5 cm; 10 cm black tape approx. 6 mm; 25 cm of black lace ribbon 8 mm wide; 20 cm red and white striped stripes; embroidery needle; sharp scissors.
DESCRIPTION OF WORK: Red Riding Hood's motive to transfer to tracing paper and reduce to a size of approx. 7.5x7.5 cm. Outline the motif with a black felt-tip pen. The motive is to scan and print on film to transfer the image to the fabric. According to the instructions of the film manufacturer, the motive should be transferred to the flap of cotton fabric (in the middle). Around the motif, draw a circle with a diameter of 9 cm and cut out with a wavy edge.
The embroidery scheme of the fir trees should be transferred to tracing paper, the contours of the scheme should be circled from the wrong side with a pencil for drawing the picture with ironing. Transfer the scheme with a steam-free iron to a piece of cotton cloth. Using cotton yarn (in 3 threads) embroider curls along the contours applied to the fabric. Spruce to embroider with stretch stitches (in 4 threads).
Around the embroidery, draw a circle with a diameter of 7.5 cm, cut.
Fold parts from felt across in half, iron bends. Then lay out the parts again. Put a middle mark on the front of each part.
For a cover with a Little Red Riding Hood, a fabric with a motive to lay on the front side of the felt part in the middle and sew along the edge with black cotton yarn, laying the stitches of the “forward needle” stitches. Tie a strip of ribbon with a bow and sew on one side. Similarly, put fabric with embroidery on the front side of the second felt part and sweep it; on the edge of the circle, sew a lace ribbon in a narrow zigzag stitch. Fold each piece of felt across in half with the front side inwards, grind side sections (allowances for 1 cm seams). At the bottom corners, lay diagonal stitches 1 cm wide. Unscrew covers.
Unscrew the upper section of each cover on the wrong side, approx. 2.5 cm, at a distance of 2 cm from the edge, lay a wide zigzag stitch. Sew a button on the front side of the cover with embroidery over the seam in the middle. From a narrow black ribbon, form a loop and sew it on the back of the cover.

EMBROIDERY PICTURES
The walls of the house are the custodians of not only family stories, but also children's tales.The hoop motifs are partially drawn, partially embroidered. They perfectly decorate the walls of the children's room. However, they can not only be hung on the wall, but also, for example, put on a shelf with children's books or on a desk.
Size: diameter approx. 18.5 cm, 21.5 cm and 25 cm.
The motives in the mirror image are given in the series at the beginning of the article.
YOU WILL NEED: For each motif, a flap of white cotton fabric size. approx. 30 x 30 cm, white, black and red embroidery threads (Anchor), black textile marker (Marabu), 1 transfer marker, the lines of which appear when ironed, transparent paper. Hoop diam. 18.5 cm, 21.5 cm and 25 cm. 25 cm red ribbon approx. 8 mm, 1 embroidery needle with a sharp tip.
DESCRIPTION OF WORK: Wash the fabric first. In the middle of the fabric flap, draw a circle for the dia. 23.5 cm, 26.5 cm, 30 cm. Sew fabric sections with a dense zigzag.
Copy the motif onto transparent paper and enlarge to the desired size so that the motif becomes a whole 10 cm smaller than the fabric. Translate using a marker, put three dots at the end of the inscription. Then, the motive should be ironed in the middle of the flap; the ironed motif will no longer be in a mirror image, as on paper.
Motifs can be completely or partially drawn using textile markers, or embroidered with a smooth embroidery floss in 3 additions. Let the paint dry for half an hour before continuing. Embroider a stitch seam or straight stitches along the contour of the areas painted with a marker.
ASSEMBLY: Fix the finished painting with an iron (heating mode - cotton).Put the finished work on the hoop, tie a red ribbon on the hoop on the lock with a bow.
Photo: Adriano Brusaferry. Production: Dagmar Bili.
The material was prepared by Elena Karpova.