Share
Pin
Tweet
Send
Share
Send
Scrub, soap and bath balls, thread paintings, fragrant sachets and painted coasters for decorations - making these and other cute holiday gifts is very simple, and the effect will be amazing!
1. Fragrant linen sachets
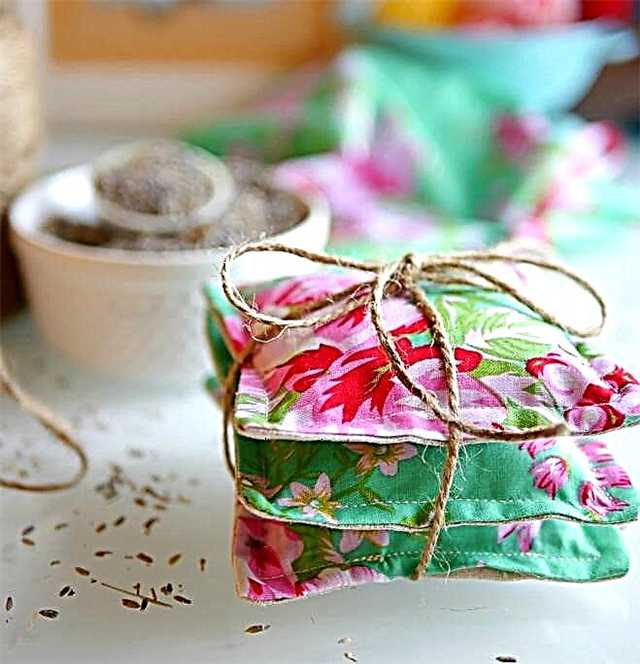 Photo: kimberlylayton.com
A sachet is a small bag filled with aromatic herbs that is placed in a closet with linen or clothes. Lavender sachets repel moles and give things a pleasant smell.
You will need fabric, a needle, threads and lavender (dry lavender can be bought at the pharmacy). If there is a sewing machine and you know how to use it - excellent, otherwise sew manually.

Photo: kimberlylayton.com
Cut out small squares from the fabric. Fold them with their sides inward and sew on three sides. Turn and fill the bags with lavender. Gently sew the remaining open side - however, if in doubt about your tailor's abilities, you can bandage the pouch with a ribbon or string.
 Photo: kimberlylayton.com
How to sew tulips with your own hands: master class
2. Bath bombs
 photo: mylce.ru
Taking a bath, dissolving such a “bomb” in water is a real pleasure. Depending on the components of the ball, the bath will be refreshing, relaxing, moisturizing the skin and so on. The shape and color of the bombs can also be different - this will require appropriate molds and dyes.
Basic recipe:
- baking soda - 2 parts;- citric acid - 1 part.
You can also add:
- sea salt - soothes, heals the skin;- dry cream - moisturize and nourish;
- base oils (peach, olive, castor, coconut and so on) - soften, nourish;
- essential oils (the choice is very wide, the effect depends on the oil: mint - refreshes, citrus fruits - improve mood, conifers - invigorate, lavender - heals the skin);
- natural (beet juice of coffee, cocoa) or food coloring - gives color;
- flower petals - create a mood.
Oils can be bought at the pharmacy, sea salt - in the same place, dyes, soda and citric acid are sold in supermarkets, petals can be taken from fresh or dried flowers.
 Photo: soapqueen.com
Manufacturing technology:
If you use coarse sea salt, it is best to grind it in a coffee grinder or crush it in a mortar. Work with gloves. Mix 2 parts soda with 1 part citric acid and 1 part salt. Add oils, dyes, other ingredients. Moisten the mixture with spray water so that the consistency resembles wet sand (it is important not to overdo it with water). Mix the mixture well and fill it with forms. Leave to dry for a day and remove the bombs from the molds. Photo: soapqueen.com
As forms, you can use small cups, cups, muffin tins, even baby tins. Flower petals can be mixed into the mixture or poured onto the bottom of the molds.

Photo: goodhousekeeping.com
3. Body scrub

Photo: soapqueen.com
The three best foundations for DIY scrubs are ground coffee, sea salt, and coarse sugar. Coffee tightens the skin and gives a feeling of vitality, salt is good for normal and oily skin, sugar cleanses as soft and gentle as possible.

Photo: foodfunfamily.com
You will also need a little liquid soap, possibly essential or base oils (see above for their properties) and a beautiful jar for scrub. You can add flower petals, dry or fresh (rose, chamomile, lavender) or herbs (mint, rosemary). Too large ingredients (salt, herbs) are better to grind, so as not to scratch the skin. The added lemon juice will lighten and refresh the skin, a spoon of honey will moisturize.

Photo: foodfunfamily.com
Mix all the ingredients in a bowl and add liquid soap so that the scrub is moist, but not too liquid. Put in a jar.

Photo: foodfunfamily.com
How to make soap with your own hands: master class
4. Homemade soap

Photo: soapqueen.com
Making soap is not at all as difficult as it seems. In this case, the gift will look simply luxurious - especially if you pick up interesting dyes and / or molds.

Photo: soapqueen.com
For a basic recipe you need:
- ordinary baby soap - 1 or 2 pieces;- oil (olive, castor, coconut, etc.) - about a teaspoon;
- multi-colored dyes (it is better to take food, often in stores they are sold by Easter);
- forms - large rectangular (then the finished soap will need to be cut with a knife) or small curly (the same children's molds, cups, silicone baking dishes).

Photo: soapqueen.com
Process:
- cut the baby soap with a knife into small pieces, put in a glass dish and melt in the microwave or in a water bath. Important: the soap should dissolve, but not boil;- add base oil (not more than a third of a teaspoon per 100 g of soap) and a few drops of essential oil to the resulting base;
- divide your soap into several parts, 2 or more. In each add a little dye of a different color. If the dye is dry, first dilute it with a small amount of water, and then pipette it into soap and mix;
- pour the soap into the forms in layers of different colors: for example, yellow-orange-red;
- Allow the soap to solidify and remove from the molds.
In the soap you can add sea salt, flower petals, even tea (green or black) - then it will have the effect of scrub. These ingredients can be added to a liquid base or sprinkled with soap that has already been poured into forms, but not yet frozen.

Photo: soapqueen.com
5. Handmade chocolates

Photo: popsugar.com
The main secret of homemade sweets is to take quality ingredients: good chocolate and filling. The shape of handmade sweets does not have to be correct: its unevenness will emphasize the “man-madeness” of origin.

Photo: chocolatery.net
For a basic recipe you will need:
- on a bar of dark and white chocolate without filling;- 2 tablespoons of honey or sugar syrup (for example, from jam);
- for the filling - nuts, prunes, dried apricots;
- for sprinkling - cocoa powder.

Photo: chocolatery.net
Stuffed sweets can be made in two ways. For the first, you will need molds in which the candies will solidify, and a blender, for the second, enough cling film.
1 way
Grind prunes with nuts in a blender. Add honey or sugar syrup. Melt the dark chocolate in a water bath. Pour some chocolate into the molds so that it covers the bottom and walls. Refrigerate for 30 minutes to freeze. Then gently put the stuffing prepared from prunes and nuts on it. Top with a layer of melted white chocolate. Put in the refrigerator again until it solidifies.2 way
Choose large pitted prunes, rinse and dry well. In the middle of each prune put a whole nut (hazelnut, almond). String the prunes on a stick and dip in melted chocolate, then gently put on a spread film and leave to harden.Sweets can be sprinkled on top with cocoa powder or garnished with contrasting strips of white / dark chocolate, after melting it and pouring it into a bag with a thinly cut tip. The top can be decorated with a nut.

Photo: chocolatery.net
Packaging for sweets can also be done with your own hands.
How to pack a gift beautifully: 22 ideas
6. The picture of the threads

Photo: ratatum.com
To make a picture of threads, it is not necessary to be able to draw. But you need daddy help or the ability to handle a hammer and nails.
You will need: a finished drawing on a piece of paper (if you wish, you can create it yourself), a small board (a wooden cutting board is suitable - you can buy it on the household), a hammer and nails, threads of one or several colors - depends on the picture.

Photo: ratatum.com
Put the picture sheet on the board. Drive nails along the edge of the picture. Remove the paper. Tie the end of the thread to one of the studs and start braiding the pattern, doing it arbitrarily.

Photo: ratatum.com
If you wish, you can leave the picture translucent or tightly “paint” it with threads, use one or more colors.

Photo: ratatum.com

Photo: ratatum.com
We dye the fabric with natural dyes
7. Wax crayon print

Photo: youtube.com/HandMade_Best
You can decorate a t-shirt, a fabric bag, or a plain scarf with wax crayon patterns. We recommend that you use specially purchased items, rather than something found in your mother’s wardrobe, to decorate to avoid confusion.
Required: T-shirt (bag, scarf), wax crayons, sharpener, masking tape, paper, unnecessary fabric and iron.
Sharpen the crayon shavings. Mark the place of the picture on things and protect the nearby places with masking tape. Pour the chips randomly, cover with paper, on top with cloth and iron with a hot iron. When the drawing has dried, remove the fabric and carefully detach the paper. A thing decorated in this way is best washed only by hand.
8. Print using a template

Photo: frame.bloglovin.com
Using the template, you can paint with any drawings the same bag or T-shirt, pillowcases of decorative pillows, napkins or towels.
You will need acrylic paint for fabric (sold in stationery, needlework, art stores), a sheet of thick paper, a sponge.

Photo: frame.bloglovin.com
First you need to make a template. For a drawing in the form of a leaf of a plant called monstera, as in the version in the picture, download and print the template, transfer it to thick paper and carefully cut along the contour.

Photo: frame.bloglovin.com
Now prepare the thing that you will colorize - iron it and place it on a flat surface. Put the template on the fabric, dip the sponge in the paint and apply the drawing with blotting movements. Then let the paint dry. Done.

Photo: frame.bloglovin.com
Printing on fabric: DIY design
9. Ombre bag

photo: hisugarplum.com
In general, the word "ombre" is now called the fashionable manner of dyeing hair, when one color smoothly passes into another. The way to color a bag (or a t-shirt, scarf) with the ombre method gives an equally impressive result.
You will need a ready-made cotton bag (t-shirt, scarf), dye for fabric (sold at hardware stores or for artists), a basin or bucket.

photo: hisugarplum.com
Dilute the dye in water according to the instructions and immerse the bottom of the bag into it. Hold in the paint for a short time, lift it up a little. Repeat this operation several times so that the lowermost edge of the bag stays in the dye solution for the longest time and, accordingly, is saturated with paint more intensively.

photo: hisugarplum.com
Follow the instructions for the paint, rinse the fabric and dry it.
10. Print using "natural" stamps

Photo: makinghomebase.com
Another way to decorate a thing with a pattern is to use stamps. In our case, “natural” stamps made from half a lemon and an orange. You will need an orange and lemon, which must be cut in half, and acrylic paint for the fabric. The principle of operation is simple: dip the halves of the fruit into the paint and apply it to the fabric. Leave to dry.
11. Saucer for jewelry
Rings and other jewelry are conveniently stored in a special saucer. It can be put in the bathroom or on the dressing table - jewelry will not be lost. You can buy a small ceramic, glass or porcelain bowl and decorate it with a picture, using paints for glass or ceramics (sold in needlework and art stores).
photo: hisugarplum.com

photo: blog.etsy.com/Sarah Goldschadt

Photo: coolcrafts.com

Photo: coolcrafts.com

Photo: coolcrafts.com
Paper flowers by March 8: master class
12. Succulents in the "aquarium"

photo: hisugarplum.com
Succulents are plants that can store water in their leaves and stems. A composition of such indoor plants looks both beautiful and unusual, plus it does not require special care: in nature, succulents can grow on sand and stones. Small cacti, aloe sprouts and crassulaceae can be bought in a flower shop and put them in an “aquarium” made of a transparent glass jar, a glass or a round glass for wine or cognac.

photo: hisugarplum.com
Also stock up with plant soil and a few handfuls of beautiful pebbles (all this can also be found in flower shops). At the bottom of the "aquarium" we pour a layer of pebbles, then the ground, into which we plant one or more plants, then another, thin layer of pebbles. The composition can be decorated with small decorative figures, for example, animals.

photo: hisugarplum.com
Share
Pin
Tweet
Send
Share
Send